• Making the Dough
• Baking
• Basil
• Fresh Mozzarella
• Coarse Sea Salt
• Olive Oil
• Sauce
• Photos
• Misc.
• Ricotta and Whey
• Photos 2
• White whole wheat flour addition
• Fresh milled spelt flour
Homemade Neapolitan-style pizza
This recipe was adapted from information found at http://www.fornobravo.com
This is a basic recipe for making the "Margherita" style pizza. This makes four pizzas that are at least 10 to 12 inches in diameter. Since I use a baking stone instead of a pizza stone, I have to shape my pizzas in an oval or rectangle shape.
Baking stone is 12 in by 14 in and a half-inch thick. A nice pizza stone is 16 in by 18 in and 3/4 inch thick.
Ingredients
- all-purpose flour - 550 g
- water - 360 g - (65% hydration)
- fine grain sea salt - 11 g
- dry active instant yeast - 4 g1
Update July 21, 2013: - see footnote for my new prefs for dough recipe.2
Update again September 2013: - preferred recipe that's a variation on the above recipe.
New version April 2014: - used fresh milled spelt flour instead of white whole wheat flour.
g=grams. I only bake with a measuring scale. I don't rely on "cups" or "tablespoons" as a measuring metric.
Making the Dough
- Mix dry ingredients together in a bowl.
- Add water to dry ingredients.
- Mix with hand whisk for 1 to 2 minutes.
- Knead dough in bowl for 1 minute to make sure water and flour are incorporated into a sticky, shaggy blob.
- Dump dough on counter and cover with bowl for 10 minutes. This rest period is known as autolyse. Flour absorbs water and gluten strands develop. Experiment with 20 to 30 minute autolyse times.
- Knead dough for 5 minutes on counter.
- Place dough in a large Pyrex bowl or something similar and cover with plastic.
- Let dough ferment at room temp for 2 hours. (maybe longer in the winter with a cold house). The fermented dough should at least double in size. The time also depends upon whether you use refrigerator-temped water or room-temped water. I normally use the water from the filtered pitcher in our frig.
- After fermenting, punch down dough in bowl and dump dough onto counter.
- Shape into one mass and divide it equally by size or weight into 4 pieces.
- Gently shape each piece of dough into a ball. Then stretch the top of the ball down and around the rest of the ball, until the outer layer wraps around the other side. Pinch the two ends together to make a smooth ball with a tight outer "skin."
- Set dough balls seam-side down, lightly flour, and cover with plastic.
- Let dough balls proof at room temp for 1 to 1.5 hours. The dough balls will dramatically increase in size while proofing.
- If not baking soon after proofing, then wrap dough balls in plastic and place in a plastic bag or container and set in the refrigerator. It's better to allow the dough to rest in the frig for at least 24 hours. The dough seems to work better after it has "aged" for a day or two in the frig. When time to use, remove from frig and allow dough to warm at room temp for at least hour. From the above website: "Try making your pizza balls the day before you need them. Overnight refrigeration helps the dough develop more flavor, and a fully developed dough browns better in your oven."
Baking
- Place stone on rack in oven. I use the lowest or second lowest rack level.
- Preheat oven to at least 500 degrees with stone in oven for at least 30 minutes.
- Flatten one proofed dough ball into a saucer plate-sized disk.
- Drape dough onto the backs of the knuckles of both hands.
- Stretch and work the dough with the backs of the knuckles.
- You can also grab the dough along the edge and let gravity stretch it. Keep working around the dough to form the desired shape and to keep it relatively the same thickness (or thinness for this pizza.) The dough will get so thin in some areas that you can see light through it. If a hole forms, pinch dough together and let it rest a bit on the counter and then resume shaping.
- I scatter semolina flour onto a wooden peel. This allows the dough to slide easily from the peel to the stone.
- You can stretch the dough some more on the wooden peel. The dough will spring back some. I try to leave dough a little thicker around the edge.
- Add thin layer of sauce.
- Add chunks of fresh mozzarella cheese.
- Drizzle or pour on some excellent olive oil.
- Sprinkle on some coarse grey sea salt.
- Check to make sure the pizza still slides easily on the wooden peel. If not, gently lift dough and add more semolina. It's frustrating when the dough sticks to the peel.
- Slide dough onto stone. This is tricky to do with the smaller baking stone, since sometimes my dough will be as long or even longer than the stone. I need to upgrade to the larger pizza stone.
- Bake at 500-plus degrees for 8 minutes or when you think it's done.
- The edge will bubble up some and some charring will occur, which is nice.
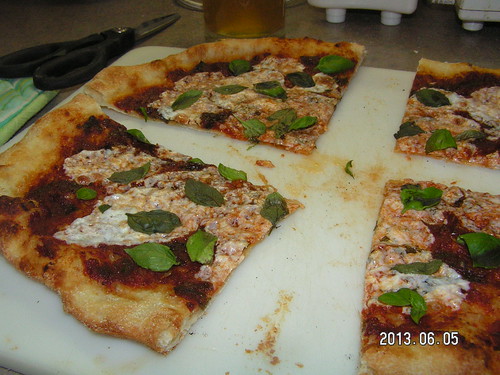
- When done baking, place on a cooling rack, and immediately add the fresh basil leaves. Don't places basil leaves onto pizza prior to baking, since the high heat will shrivel the leaves to almost nothing. The pizza surface is still plenty hot enough after baking that the fresh basil leaves will "cook" a little.
- After five or so minutes of cooling, cut and enjoy. The crust will be credit card thin in some areas. The baked crust will be a bit firmer near the outside edge and a little floppy toward the center.
Basil
We keep a fresh basil plant growing outside during the warm time of the year and inside the house during the winter, although it's not easy. Fresh basil can be purchased at the grocery store.
Fresh Mozzarella
This is not the shredded cheese that is sold in a ziplock-style plastic bag.
I buy the small, barrel-shaped mozz that is hand-wrapped tight in thin plastic. Then I cut slices that I place onto the pizza.
We have the homemade mozz cheese-making kit, but we have not tried it yet. [we make ricotta cheese, which we use on this pizza recipe.]
Coarse Sea Salt
This salt looks like tiny gravel. It dissolves some in the olive oil. It adds a tasty touch, in my opinon.
Olive Oil
Buy a quality "finishing" extra virgin olive oil.
Sauce
When available, I use my wife's homemade pizza/pasta sauce that we can in August or September. We buy a big box of plum tomatoes from the Toledo Farmers Market.
If we are out of our canned sauce, then this simple "recipe" produces a great sauce:
- Buy a can of San Marzano Crushed Tomatoes. I buy them at The Andersons. The can will have the blue-purple band. The whole tomato version will have the green band.
- Open can of San Marzano Crushed tomatoes and place on dough.
That's it. Straight from can to dough. I like eating these crushed San Marzano tomatoes from the can. They are fabulous. I see no need to enhance the sauce, since I already add olive oil and sea salt to the pizza dough surface.
But experimenting is part of the fun.
One recommendation is to heat the sauce in a pan with additional spices or whatever before applying the sauce to the pizza. I may try adding local honey to the San Marzano tomatoes, and then cook the sauce for a little while on stove top, and then apply that to the dough. I've added honey to tomato sauces in the past, which works great.
But straight from can to dough makes for a very fresh tasting pizza. These crushed tomatoes taste great.
I'll try the San Marzano whole tomatoes and crush them by hand either with a potato smasher or literally with my hands. It's recommended that tomatoes not be crushed with a blender or a food processor, since the seeds will be broken, and that can give the sauce a bitter flavor.
Photos

Misc.
1 My natural levain or starter that I use for bread baking is comprised of 100% white whole wheat flour. Initially, I used some of my starter and also some white whole wheat flour in the above recipe. That gave the dough more flavor, but it also made the dough harder to shape because of less gluten and less elasticity from incorporating the whole wheat flour. I'll experiment more with at least using my starter. But for now to make it easy, I use 100 percent all-purpose flour. For real bread, it's all about the dough. Bread has multiple applications. But for pizza, the dough is one of a handful of quality ingredients that make for one fine meal.
2 On Friday, July 19, 2013, I did not have enough all-purpose flour, so I used 400 grams of all-purpose flour and 150 grams of white whole wheat flour. And I added about 100 grams of my sourdough starter. I still used 4 grams of instant yeast. The dough fermented for three hours and proofed for about two hours. Naturally, because of the whole wheat flour addition, the dough was harder to work when it came time to stretch out the dough for the pizza. Less elastic. Less strength. Tore some, so I patched up the holes. But the taste was outstanding. My wife and I agreed that we liked the addition of the while whole flour. So I'll experiment some more with proportions and try using only my starter and no instant yeast and increasing the fermentation time. With the white whole flour addition, the crust was a little thicker and chewier, but the taste was dramatically better.
Ricotta and Whey
August 5, 2013 recipe.
On August 4, 2013, my wife made ricotta cheese. Simple process. Very tasty cheese. She used natural milk, purchased from the Phoenix Earth Food Co-op in Toledo. The natural milk came from Calder Dairy, located in Michigan. Zingerman's in Ann Arbor makes cheese that uses milk from Calder Dairy. We like Calder Dairy's cottage cheese, butter, whipping cream, and regular milk products.
My wife saved the whey, leftover from making the ricotta. I made pizza dough that used some of the whey in place of the water. It made a tasty crust with the flour being 100 percent all-purpose flour, but the whey impeded gluten development. It was a bit harder to work the dough into a shape for the crust, even after leftover dough rested in the frig for two days.
Pizza crust made with:
- 200 g water (room temp)
- 160 g whey liquid (frig temp)
- 3 g instant yeast
- 550 g all-purpose flour
Dough fermented for four hours. House temps were in the 70s. Normally, I ferment this recipe for two to three hours, but dough development was slow. Maybe the whey recipe should ferment for five or six hours.
90-minute proof.
The leftover ricotta whey had a bit of a sour taste due to the lemon juice and the white wine vinegar that my wife used in this version of the ricotta cheese recipe.
With the dough made with 100 percent AP flour, the whey added more delicious flavor to the baked crust. But the dough was harder to stretch into the pizza shape. The dough tore easily.
After pizza dough spends a day or two in the refrigerator, the dough seems easier to work with when shaping, but that was not the case with the whey-induced dough. I wound up making breadsticks from one dough ball because it was nearly impossible to shape.
Breadsticks: I hand-rolled the dough into small logs, rolled them in olive oil, and dusted with sea salt. Baked at same pizza temp but only for about six total minutes. Half way through baking, turned the sticks over. These turned out well. Crispy on the outside and chewy in the middle.
Anyway, back to the whey-induced pizza.
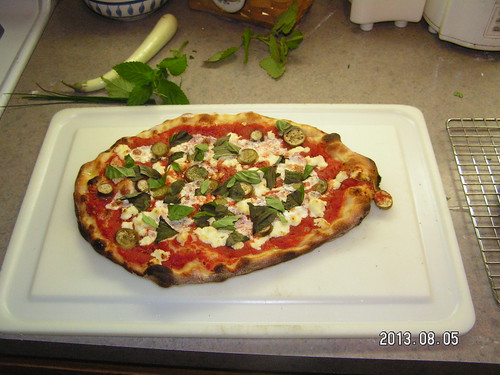
Toppings
- mozz, log, from The Andersons
- homemade ricotta
- San Marzano crushed tomatoes
- egg plant from our garden - very narrow eggplant, sliced into small disks that were nickel to quarter-size shaped
- olive oil
- coarse grey sea salt
- after baking, applied fresh-cut basil leaves from our backyard potted plant.
The second pizza did not contain the mozz, only our homemade ricotta, along with the rest of the toppings listed above.
When eating by itself, I prefer the homemade ricotta over the store-bought mozz. On the pizza, the ricotta shined as well as the mozz.
Another nice treat that uses our homemade ricotta cheese:
- lightly toasted homemade, naturally leavened sourdough bread (50% white whole wheat flour and 50% all-purpose flour)
- my wife's homemade, canned cranberry butter (jam) from last fall
- homemade ricotta cheese placed on top of the cranberry butter that's on top of the bread.
We'll try making our own mozz to see how it compares to the ricotta. The ricotta firms up in the frig, but it's easier to spread on toast than mozz. Rinnet [?] is used, I think, to firm up mozz.
Homemade ricotta is definitely a new addition to our DIY food list. It's great on pizza. And I may experiment some more with whey in the pizza dough.
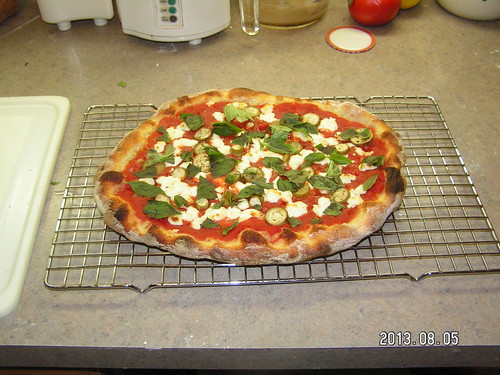
Photos 2
Eggplant, ricotta, and mozzarella.
No mozz on this one.
White whole wheat flour addition
The recipe below is different from the above version that used white whole flour.
Ingredients
all-purpose flour - 500 g
white whole wheat flour - 150 g
water - 455 g - (70% hydration)
fine grain sea salt - 13 g
dry active instant yeast - 5 g
Sep 3, 2013 pizza with the above recipe:
- added a little of my white whole wheat starter too, but I didn't weigh it the amount.
- fermented for 3.5 hours.
- proofed for at least 2 hours.
- air temp around 70 F.
- house temp in the 70s.
- low humidity
- strong, stretchy, airy dough. it bubbled while I worked it out into an oval on the back of my knuckles. and it bubbled well along the edges during baking.
Fresh milled spelt flour
Sat, Apr 5, 2014
A few weeks ago, I bought spelt "berries" from the Phoenix Earth Food Co-op. The store also sells wheat berries. This allows people to mill flour at home.
We don't have a mill, but we bought a Vitamix last year, which is a Cleveland, Ohio-made product. We use the Vitamix to make many things, including now grinding or milling flour.
We followed the directions in the Vitamix manual. We milled 180 grams of berries for about 38 seconds. The machine did a great job. The flour was fine-grain. The bits of the outer shell of the berries remained.
The flour was warm after milling. I did not let the flour cool to room temp. I decided to assemble the recipe with the warm flour in case it would make the fermentation go faster, since I started this at mid-afternoon, and I didn't want to eat late.
Ingredients
- spelt flour : 180 g
- all-purpose flour : 540 g
- room-temp water : 500 g
- salt : 14 g
- active instant yeast : 7 g
I should have milled only 150 grams of berries and followed the normal recipe that used white whole wheat. But since I didn't want to waist any spelt, I used it all and then adjusted the rest of the recipe by winging it. No calculations.
Assembled the dough per the instructions above for white whole wheat with some minor changes:
- autolyse : 15 min
- knead : 5 min
- 2nd autolyse : 10 min
- knead : 3 min
The dough seemed a bit more wet than normal, so I allowed a second autolyse and kneading, which helped.
- set up to ferment at ~4:10 p.m.
- house temp in the low to mid 60s.
- dumped dough after only 2 hours of fermentation. The dough was extremely active, maybe due to the increase in active instant yeast or the warm, fresh flour. I think that I used room-temp water, but not positive. DD did begin placing the water pitcher in the frig the next day, so I think the pitcher still sat out on Sat when I used it.
- separated dough and shaped into four rounds.
- setup dough balls to proof at 6:20 p.m.
- proofed for 1.5 hours. The dough balls expanded quite a bit into airy blobs.
- baked the pizzas on the 5th rack level from the top at 500 degrees for 9 minutes.
For ingredients, I used the marina sauce that we order online from Amazon's grocery store because we might be out of DD's pizza/pasta sauce. [I found several more jars of DD's sauce.] I should have searched the pantry in the basement better. I topped the sauce with DD's homemade ricotta cheese, olive oil, and Hawaiian red sea salt. We did not have any basil to add after baking.
When working the dough into an oval, the dough bubbled up. During baking, the edges of the dough not covered with sauce bubbled up really well.
The crust was airy, soft, chewy, and tasty. It was not hard nor firm. DD and I both agreed that this was the best crust yet. We liked it better than the white whole wheat version.
I forgot to mill extra flour to use on the peel, so I used white whole wheat flour.
The pizza would have been made better if we used DD's sauce, which is still the best pizza/pasta sauce that I have used. And it would have been nice to have fresh basil, at least from the store. We should buy a basil plant for home. We could keep it outside during some days now in the spring.
By JR
- 2967 words
created:
- updated:
- replies: 1
source
- versions
- backlinks
Related articles
Making Pizza - Apr 25, 2014
Making pizza from spent beer grains - Jul 07, 2014
Homemade Ricotta Cheese - Oct 12, 2013
Making buckwheat pancakes from Hodgson Mill mix - Jun 01, 2014
Simple dinner with some garden produce - May 19, 2016
more >>